Create a Test
You can create a test within the Pearson Access UI to administer to your students.
Prerequisites
- Confirm your role and project under your name, and your district or school in the Organization dropdown. If you have access to multiple projects or organizations, click each dropdown to select the one(s) you want to view.
- An authorized user must have previously associated you with a class before you can add the class to a session.
Step-by-Step
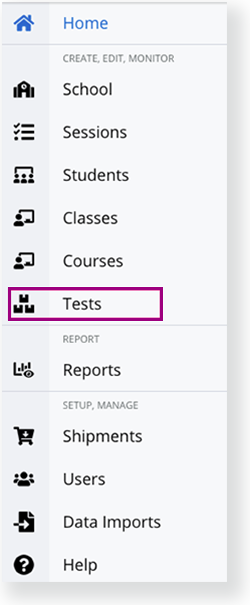
- From the main menu, click (or tap) Tests.
- Click a test type.
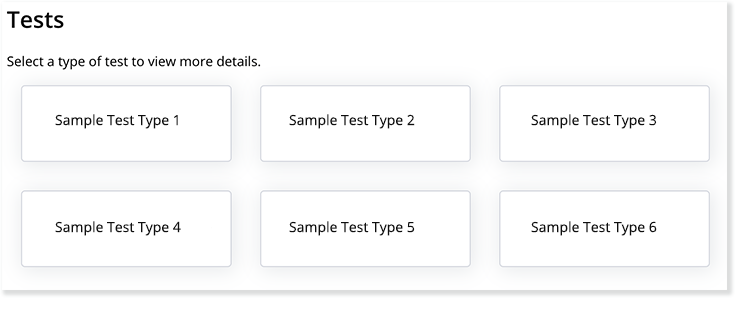
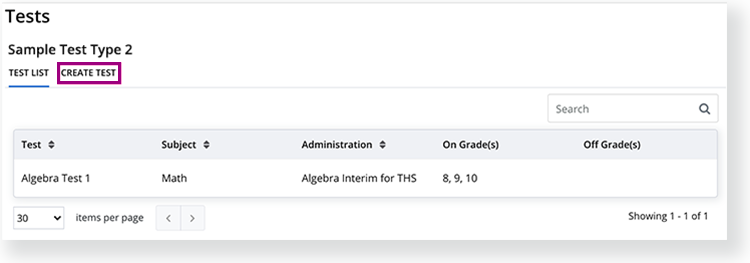
- Click Create Test.
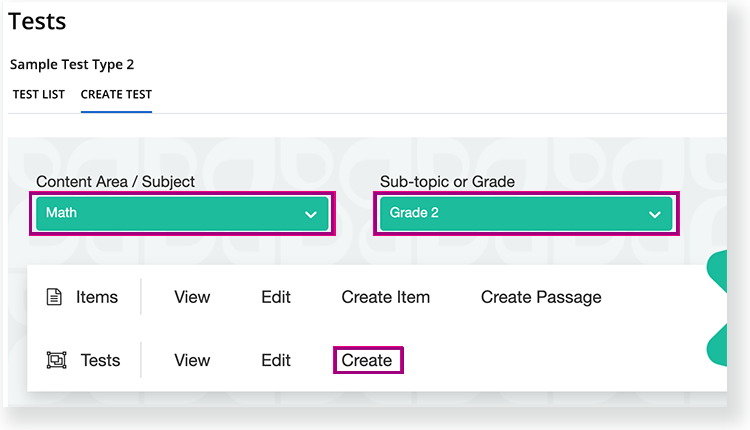
 +Select Language...
 Click Select Subject to select from the Content Area/Subject dropdown, and click Select Grade to select from the Sub-topic or Grade dropdown.
- In the Tests row, click Create.
The Test Creation Wizard appears. - Type a Unique Assessment Name and Assessment Title, and click the Assessment Type dropdown to select one (these vary by project)
Click the Publish Format dropdown to select either Online or Paper.
a. Click the Test Creation Method dropdown, select Standards Based or Item Search.

After you select one Test Creation Method in this step, you can alternate between adding items using either method while building the test.
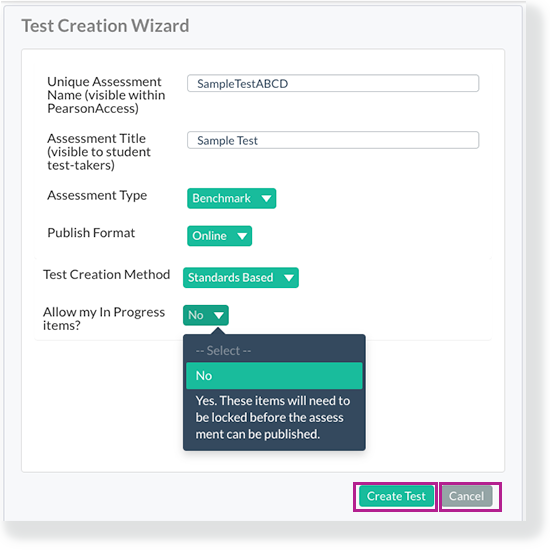
If you want to include in progress items in your test, click the Allow my In Progress Items dropdown and select Yes. These items will need to be locked before the assessment can be published.
b. Click Create Test. You can also click Cancel to cancel.
If you clicked Standards Based
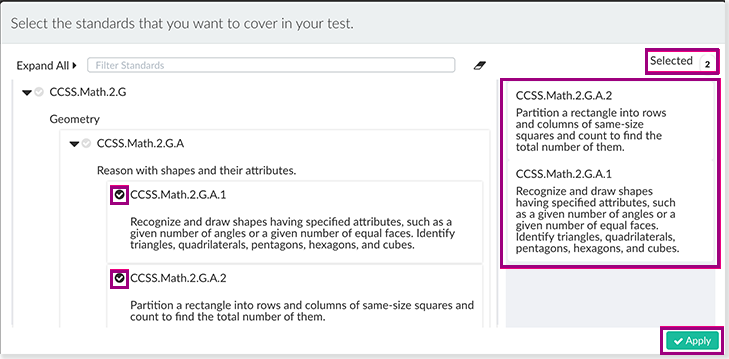
You can click:- Expand All to expand all of the available standards, and/or type in the Filter Standards field to search for standards by number or description.
- Arrows next to each standard category to expand available standards within that category.
- The Limit Search Results section gives you the option to
- Return the max number of items per standard, up to 99. Enter 99 or less in the field.
- Return a max number of items per standard that contain a selected code, up to 99. Enter 99 or less in the field.
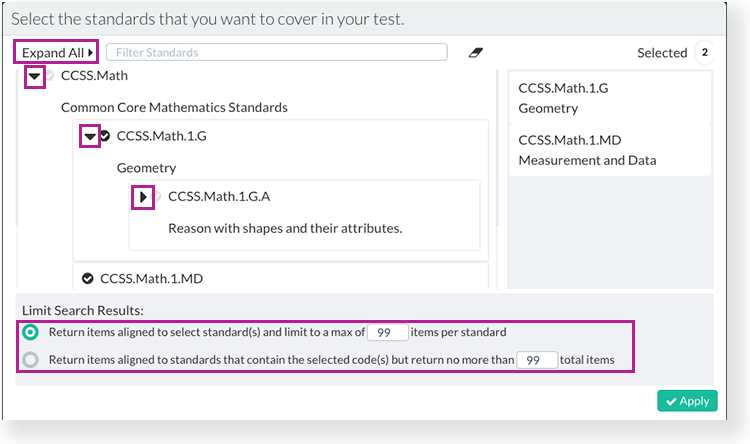
- Select standards to which you want your test items to align. Selected standards appear on the right side of the standard list.
- Click Apply. Questions appear for each selected standard with scoring information.
If you clicked Item Search
- You can click Add Filters to narrow your search, then click Search to view items. You can also click Reset to select new search filters.
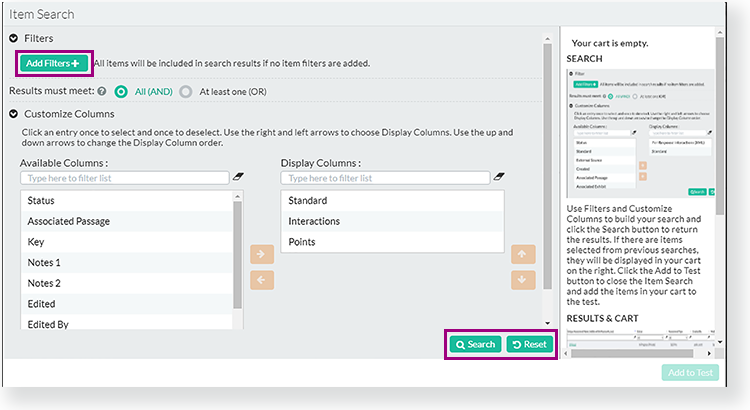
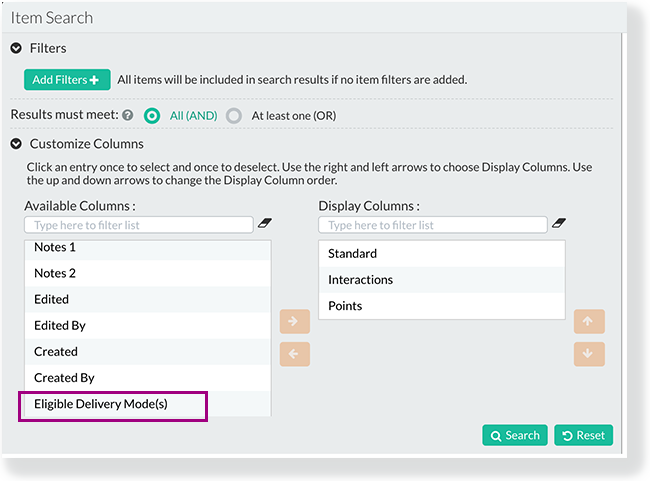
Under Customize Columns, you can click Eligible Delivery Modes and the right arrow to find items for eligible for delivery on both an online and print test, or only online.When searching for a non-AKO paper test, the system returns only paper-eligible items. The following item types are eligible for non-AKO paper tests:- Multiple choice
- Text entry (select items)
- Open response
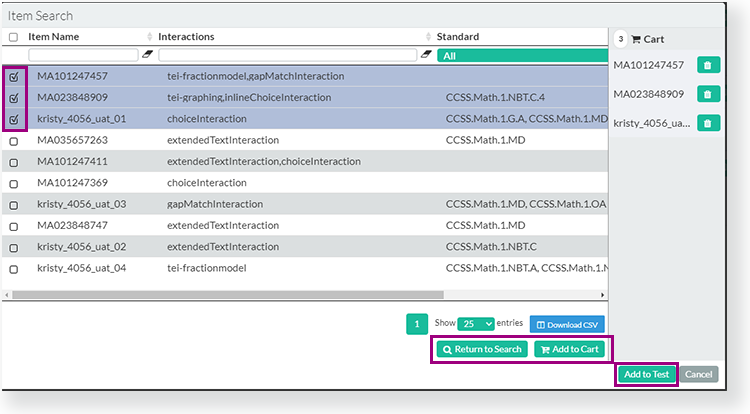
When an item is associated to a passage, the passage appears before the item. If several items are associated to the same passage, the passage only appears once before the first item.
- Select the items you want to add to your test, then click Add to Cart. You can also Return to Search to find more items. Click Add to Test when you are done selecting items. If searching for zero-point items that contain instructions, base your search on the Points column and the item name.
b. Click within the UI to delete, filter, save, and preview items.
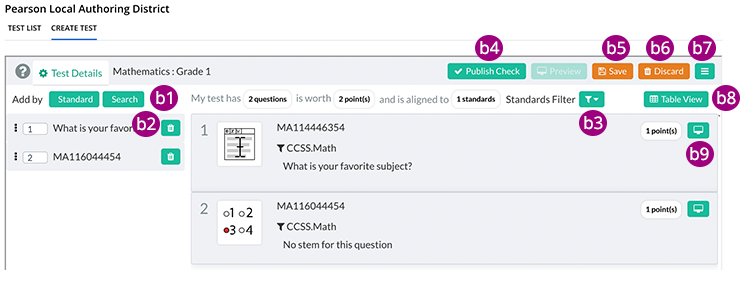
b1 - You can click either Standard or Search to add items by either method when creating your test.b2 - Click the green Delete icon (
 ) to delete an item from the test.
b3 - Click the Filter icon (
 ) to select or deselect standards to show or hide associated items.
When creating items with associated passages (after you click Save), you can click the Passage sort button to sort by items with common passages. You can also hover over the passage icon ( ) to see the passages associated with that item.
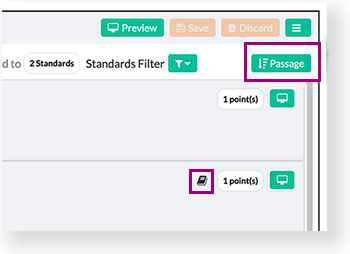
b4 - Click Publish Check to check for errors that block publish. When you change a form into a publishable status, the publish check runs automatically. You can click Download Results to download a report with errors blocking publish or Okay to close the popup.
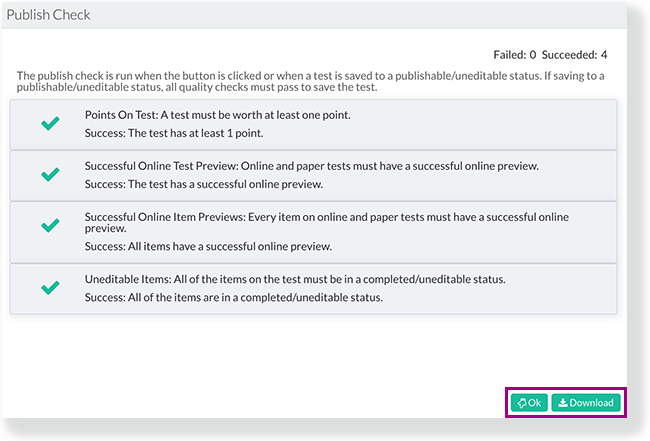
Users can go through any errors to correct them before they attempt to save the form again to a publishable status.
b5 - Click Save to save your test.
b6 - Click Discard to delete the test.
b7 - Click the Menu icon (
 ) to go back to the Editable Tests list to see the header with the View, Edit, or Create buttons.
b8 - Click Table View (or its icon) to see an an alternate table view of item data that displays uneditable information such as interaction, status, and preview success. Programs can configure specific form and item data to appear within the table view.
b9 - For an online test, you can click the Preview icon (
 ) in each item's row to preview individual items.
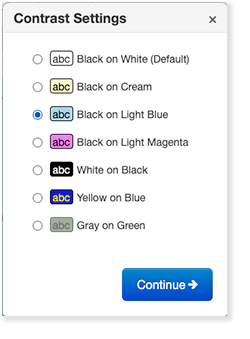
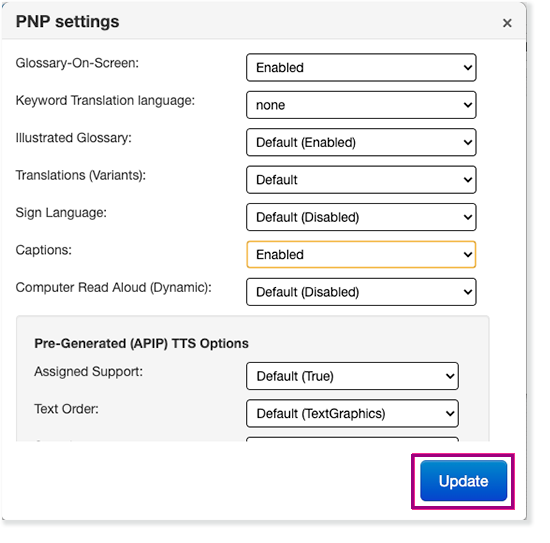
Click Get Responses to see the item's responses, or Score Responses to see score details. You can also click Contrasts or PNP to edit those settings.

c. You can click:
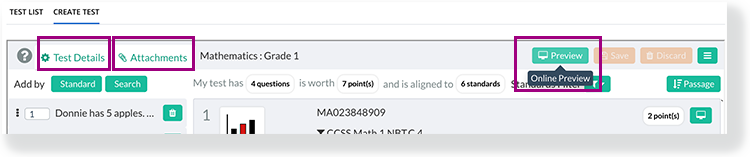
- Test Details to see Required Test Details and others as they become available.
- Attachments to add or view multiple attachments to either an online or paper test (for example, a PDF of an AKO test, sample student responses, or more detailed rubrics). Anyone with view access to the form can also view these attachments. To add or delete attachments, you must open the test in edit mode.
- Preview (within the header) to preview an entire for an online test, after you save the test.
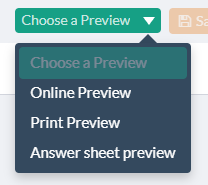
- Click Choose Preview for a non-AKO paper test, and choose:
- Online Preview
- Print Preview, or
- Answer sheet preview
Answer-Key Only
a. Select Answer Key Only from the Test Creation Method dropdown.
b. Select either By Item Keys or By Item Count from the Answer Key Only dropdown.
- By Item Keys
Enter supported characters within the item key, and click Create Test or Cancel to cancel. Supported characters within the field - A, B, C, D, T, F, Y, N, and O.
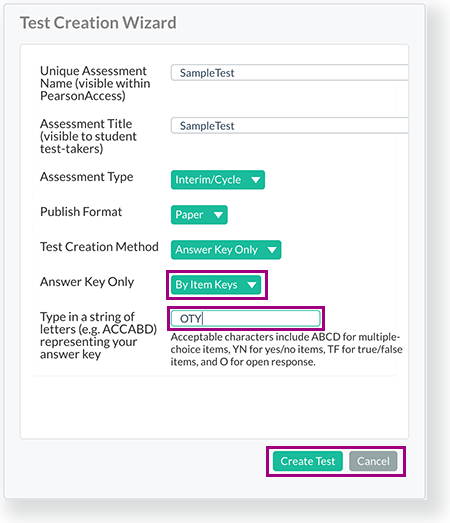
The test populates with the item types you indicated in the field. You can make further edits in the AKO UI.- By Item Count
Enter an item count for your form, and click Create Test or Cancel to cancel.
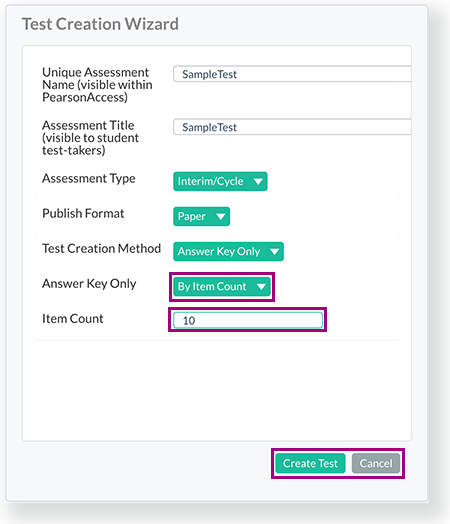
The test automatically populates with multiple choice, single select items, with four answer choices labeled ABCD.c. Edit, add, delete, and save items using the available buttons and dropdown menus.
c1 - Click the Add icon (
 ) to add an item to your test.
c2 - Click the item type dropdown to change the item type. Available item types in the dropdown vary depending on your initial selection. When searching for a paper test, the system returns only paper-eligible items.
c3 - Click the Add (
) or Subtract ( ) icons to update the number of options the student has to choose from within the item.
c4 - Click Standard to open the standard selector and select a standard to associate with the item.
c5 - Click in the points field to update the number of points the item is worth.
c6 - Click the Custom icon (
 ) to add a custom item label, and to customize a student work area and trait scoring.
c7 - Click the Save or Delete buttons to save or delete the test. After you save, you can click Preview to see a generic preview of the test form. If any aspect of the answer sheet is not as intended, you can edit it. Do not print this generic preview. You can also click the More (
) icon to go to view the header and the My Tests tab.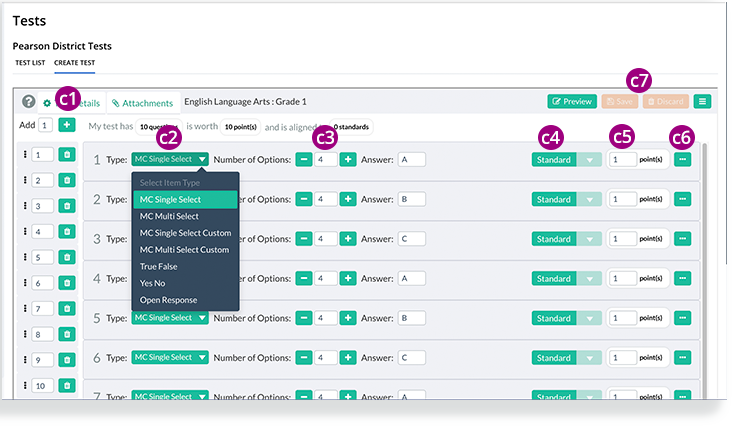
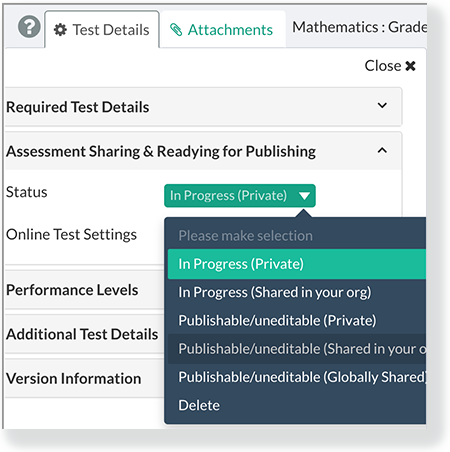
After you save, click the Test Details tab to update the test Status and Online Test Settings in the Assessment Sharing & Readying for Publishing section. You can also view or update Performance Levels, Required Test Details, or Additional Test Details. To publish, you must select a Publishable status.
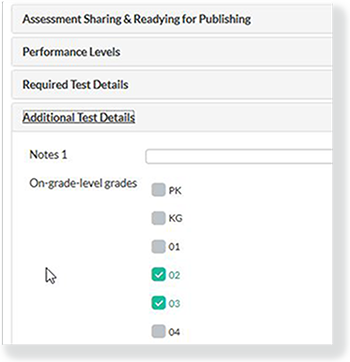
- You can click Additional Test Details to select grades that can see the test you published. You can select both on-grade-level or off-grade-level grades to indicate all grades that can view the test.
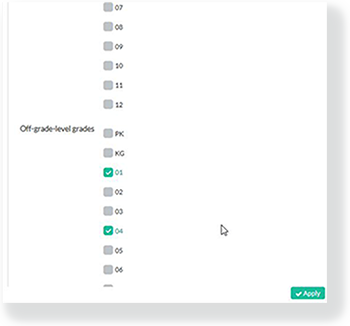
- Click Apply, and then click the Save icon (
 ) again to save your updates.
 - Click the menu icon (
 ), and then click View in the header. Your test appears in the My Tests tab. Click Publish.
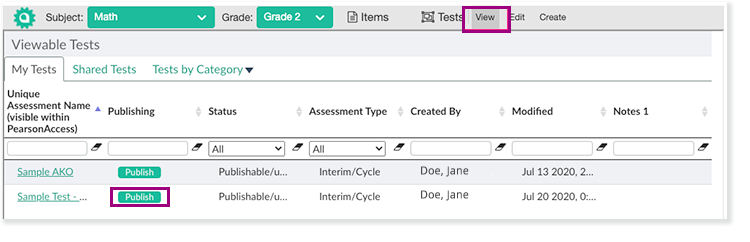
If a test you created is locked, you can click Request Unlock to the right of the test link. The system checks for item use on forms. Depending on item use, you see either of the following messages:
- This assessment can be unlocked by the assessment creator (you) since it has not yet been published. Change the status if you wish it to remain unlocked with options to EDIT or CANCEL. You can click Edit to open the form.
- This assessment can only be unlocked by the user who created it.
- This assessment cannot be unlocked because it has already been published.
- Select a Test Admin to which you want to assign your test, and click Publish. Take note of your specific test name and administration.

When the system successfully publishes your test, a green message appears: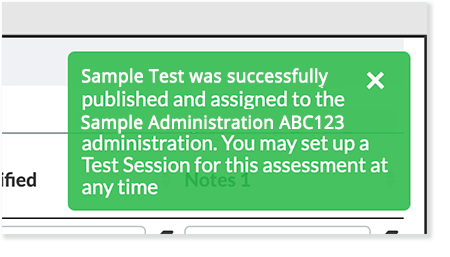
Effects
- After you publish a test, the system pushes online tests to the TestNav Previewer, TestNav, and various sections of Pearson Access. The amount of time for this to occur varies.
- The system sets a maximum of one test attempt as default for locally authored tests. If a student must retake the test, you must Void the test attempt.